How to create API using node js and Express?
Setting up a Node.js app
Step 1: Install Node.js and NPM
The first thing we’ll need to do is install Node.js on our machine. You can download the latest LTS version from the official Node.js website. Follow the prompts in the Node.js Installer and customize the defaults, if necessary. When you’re done, you should have installed Node.js, as well as NPM (Node Package Manager). You can verify the installation by running the following commands in your terminal:
node -v
npm -v
If you see the versions of Node.js and NPM show up, your installation was successful.
Step 2: Create a new project folder
Next, we’ll create a new folder for the project by running the following command in your terminal (note that entering this command as-is will name your project “node rest api,” but you can change the name, if you’d like):
mkdir node-rest-api
To navigate to your project, enter this command:
cd node-rest-api
Step 3: Initialize a new Node.js application
To initialize your app, run the following command in your terminal:
npm init
You will be prompted to enter your project name, description, and GitHub repository. You can accept the defaults by pressing Enter/Return, or customize them.
Next, open this project in your editor, where you will see a new file called package.json. This file contains the data you added about your project in the terminal. It also describes how you’re going to run the project and lists its dependencies (frameworks and libraries).
Step 4: Install Express and other dependencies
From here on, you can run all your commands in your editor’s terminal.
Run the following command to install the Express framework:
npm install express
Step 5: Import necessary modules
We’ll start by creating a new file named app.js in the root of the project directory. We’ll use this file to set up the app. Then, we’ll load the dependencies so we can use them. In the app.js file, add the following code to import Express:
const express = require(‘express’);
Now, let’s set up Express to create an app and configure it to parse requests with JSON payloads. Here’s the code you can add to do that:
const app = express ();
app.use(express.json());
Step 6: Define a route that listens to requests
Now we need to make this application a server by getting it to listen for connections. To do this, we’ll connect to a port to listen for incoming requests.
Create a new file called config.js. In this file, we’ll add the following code to set a default port:
const PORT = process.env.PORT || 3000;
With the process.env.PORT variable, we set up the port automatically by allowing the API to be deployed to a cloud platform like AWS or Azure. In case the process.env.PORT variable is not set, we’ll default to using port 3000.
Next, we’ll add the following code to the the app.js file in order to set up the server to listen on the specified port:
app.listen(PORT, () => {
  console.log("Server Listening on PORT:", port);
});
Step 7: Define an endpoint
Let’s start by defining a status endpoint to ensure the API is working.
Express lets you define routes using the app.METHOD() function. Here, METHOD refers to the different HTTP methods, like GET, POST, PUT, and DELETE. For a GET request, you’d define the route by adding an app.get() function. This function has two parameters. We’ll use the first parameter to define the path. In this case, it is the /status endpoint:
app.get(“/status”, ());
Next, we’ll add a callback function as the second parameter, which defines what we will do when the request is called. This function has two parameters: the request object (which contains details like the HTTP method, headers, and request body) and the response object (which defines the information that we want to send). The response (res) object contains different methods of sending a response to the client, such as res.send(), res.json(), and res.render().
Here’s what it looks like now:
app.get(“/status”, (request, response));
With response.send(), we then define the response we want to return. But since we want to send back JSON, we’ll need to first define a JSON object. So, we define a status variable and create an object:
response.send(status) is now a function that takes the JSON object as the argument.

app.get(“/status”, (request, response) => {
   const status = {
      “Status”: “Running”
   };

   response.send(status);
});
Challenge for you: Go to your Postman account and test the /status endpoint with the GET request method. You should get a response that says “Running,” as shown below:
If you receive the expected response, congratulations! You’ve just created your first API.
Similarly, you can use app.post(), app.put(), and app.delete() to handle other request methods.
Creating a user management API with Node.js and Express
Now, we’ll create the following API endpoints for user management:
- POST
/signup: Registering a new user - POST
/login: Logging in - GET
/user: Retrieving a user’s profile (restricted to the user themselves) - PATCH
/users/:userId: Updating a user’s profile (restricted to the user themselves) - GET
/users/all: Retrieving all users (available to all users) - PATCH
/user/change-role/:userId: Updating a user’s role (restricted to admins) - DELETE
/user/:userId: Deleting a user (restricted to admins)
We’ll also look at how you can use JSON web tokens (JWTs) to set up authentication for certain endpoints.
We recommend trying out the user management API to understand what responses you can expect.

To get started, clone the companion repository that contains the entire code for the app and use this tutorial to understand the basics of how we go about creating the user management app.
Once you’ve cloned the repository, navigate to the e-commerce-service project, where you’ll find the following folders:
- authorization: contains everything related to the
/signupand/loginendpoints. - common: contains middlewares and models used for all endpoints.
- storage: stores all the data for the app locally.
- users: contains everything related to all of the user endpoints.
Run npm install to install the following libraries that we will be using:
- Express: A Node.js framework for API development.
- Sequelize: A Node.js ORM (object-relational mapper) tool that helps with connecting to a database.
- SQLite3: A library that helps us to create a database, define tables, and manage a SQLite database file.
- jsonwebtoken: An implementation of JSON Web Token (JWT), an open standard (RFC 7519), used to securely transmit information between parties as a JSON object.
- AJV (Another JSON Schema Validator): A library that helps us validate the payload received against a structure defined using a JSON Schema.
Defining the user module
In real-world apps, we use databases to store data more efficiently. Since this is only a simple project, we wanted to keep things easy. So, we will build the API with SQLite, define the structure of the data in common/models/User.js, and store data in storage/data.db.
We’ll start by creating a new file called User.js. Next, in the same file, we will define our schema, which holds all the properties of a user (such as email, username, and password).
We’ll also specify the data type—and whether the data can be left void—for every user property. For the user ID, we’ll use auto-increment to automatically create a unique number when a new record is inserted into the table:
const { DataTypes } = require("sequelize");
const { roles } = require("../../config");
const UserModel = {
  id: {
    type: DataTypes.INTEGER,
    autoIncrement: true,
    primaryKey: true,
  },
  username: {
    type: DataTypes.STRING,
    allowNull: false,
    unique: true,
  }
};
Similarly, you can also define other properties, such as email, password, age, role, firstName, and lastName, in the schema.
In the same User.js file, we will define an initialize method to register our schema with the Sequelize library and return a model. The returned model can then be used to manipulate (i.e., create, read, update, and delete) the data stored in the database.
Here’s how you can define a function to create a user:
module.exports = {
  initialize: (sequelize) => {
    this.model = sequelize.define("user", UserModel);
  },

  createUser: (user) => {
    return this.model.create(user);
  }
};
You can also define wrapper functions that consume the Sequelize library to get and update entries in the database, just like we did for createUser.
Now, we’re all set to define operations with the user module. Let’s look at how to define the /user endpoint.
We’ll start by creating a file named UserController.js, which will hold all the controller functions for the different routes related to the user module, like getAllUsers, updateUserDetails, etc.
Refer to the example below to understand how to set up the getAllUsers controller function. This function uses the findAllUsers function created in the User.js file above to fetch all the users from the table and return them in the response:
getAllUsers: (req, res) => {
  UserModel.findAllUsers({})
    .then((users) => {
      return res.status(200).json({
        status: true,
        data: users,
      });
    })
    .catch((err) => {
      return res.status(500).json({
        status: false,
        error: err,
      });
    });
  },
We will import the UserController in the users/route.js file and define the route as shown below:
router.get("/", UserController.getAllUser);Next, we need to register the users/routes.js file in our index.js file so that any calls made to the /user endpoints are routed to the correct file. To do that, we add the following code:
const UserRoutes = require("./users/routes");

app.use("/user", UserRoutes);
Defining the auth module
In this tutorial, we’ll implement authentication and authorization using JSON Web Tokens (JWT). JWT generates a valid token for the user and ensures that only authenticated users can access specific API endpoints.
When the user provides the necessary payload while registering or logging in, we will provide a token in return. The token typically expires after a period of time. To keep things simple, we will only focus on creating a single token.
Now we can define the /signup endpoint. The payload needs to contain firstName, lastName, email, username, password, role, and age. Here’s an example:
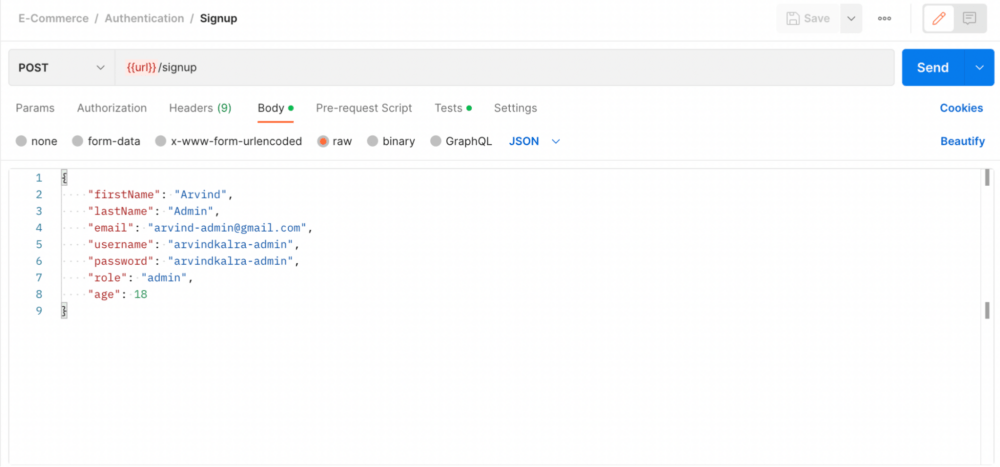
We will set up a controller to create a new user in the User table using helper functions defined in User.js—and also generate a JWT that will be returned as the response. Additionally, before storing the user in the table, we will hash the password using the SHA246 algorithm for better security:
module.exports = {
  register: (req, res) => {
    const payload = req.body;

    let encryptedPassword = encryptPassword(payload.password);
    let role = payload.role;

    if (!role) {
      role = roles.USER;
    }

    UserModel.createUser(
      Object.assign(payload, { password: encryptedPassword, role })
    )
      .then((user) => {
        // Generating an AccessToken for the user, which will be
        // required in every subsequent request.
       const accessToken = generateAccessToken(payload.username, user.id);

       return res.status(200).json({
         status: true,
         result: {
           user: user.toJSON(),
           token: accessToken,
         },
      });
    })
      .catch((err) => {
        return res.status(500).json({
          status: false,
          error: err,
        });
      });
    },
The generateAccessToken function used in the code above uses the jsonwebtoken library to generate a JWT that can be returned back to the user.
Now, we need to create the route and invoke the controller function that we just created. We can do that by adding the following code in authorization/routes.js:
router.post( "/signup", AuthorizationController.register);
Likewise, you can also define the /login endpoint.
We also need to register the authorization/routes.js file in our index.js file so that any calls made to the /login or /signup endpoints are routed to the correct file. To do that, we add the following code:
const AuthorizationRoutes = require("./authorization/routes");
const UserRoutes = require("./users/routes");

app.use("/", AuthorizationRoutes);
app.use("/user", UserRoutes);
Defining permissions and validating data
We need to make sure that only authenticated users can securely access data in the Users resource.
Let us define a middleware that checks if the user is using a valid JWT. To do this, we’ll add the following code in common/middlewares/IsAuthenticatedMiddleware.js:
module.exports = {
  check: (req, res, next) => {
  const authHeader = req.headers['authorization'];

  // IF no auth headers are provided
  // THEN return 401 Unauthorized error
  if (!authHeader) {
    return res.status(401).json({
      status: false,
      error: {
        message: 'Auth headers not provided in the request.'
      }
    });
  }
Here, we’re checking for the presence of auth headers. If no auth headers are provided, we return a 401 unauthorized error. Likewise, we also add checks and return the same error when a bearer auth header is not provided, or when a bearer auth header is provided, but a token is not provided.
In common/middlewares/CheckPermissionMiddleware.js, we’ll check for permissions and validate if the user:
- exists in our database (to access the
/userendpoint). - has the required
Adminrole (to access the/users/alland/user/change-role/:userIdendpoints).
Here, we’ll check if a user is in our database, and return a 403 forbidden error if not:
module.exports = {
  has: (role) => {
    return (req, res, next) => {
      const {
        user: { userId },
      } = req;

   UserModel.findUser({ id: userId }).then((user) => {

    // IF user does not exist in our database, means something is fishy
    // THEN we will return forbidden error and ask user to login again
    if (!user) {
      return res.status(403).json({
        status: false,
        error: "Invalid access token provided, please login again.",
      });
    }
Now, we’ll add the authentication middleware to the user’s module routes in /users/routes.js:
We can update the getAllUsers endpoint created to the code given below:
router.get("/",[IsAuthenticatedMiddleware.check, CheckPermissionMiddleware.has(roles.ADMIN)] , UserController.getAllUser);
This way, the /user/all endpoint can only be accessed by a logged in user who has the Admin role.
If you’ve tried this out on your own, congratulations on creating your first app using Node.js! You now have a solid foundation for building powerful and scalable APIs for your web applications.